Showing posts with label Photo Repair. Show all posts

11 March 2011

Photo Edits - Catherine Grace - Tear Repair and Spot Healing

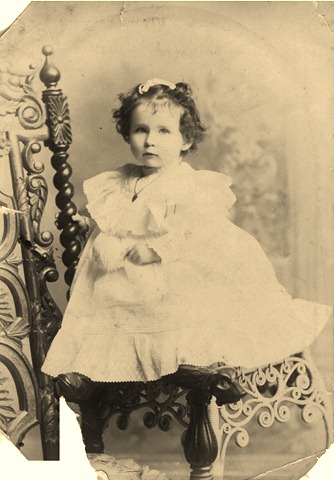
Here is our starting image of Catherine with lighting and color adjustments:
Lightroom is always my starting tool for photo repair. I try to do as much as possible there and then, if necessary, move into Photoshop Elements for further editing. The Clone or Heal Brush included with Lightroom is quite effective with small damaged areas. Here is a closeup of one area that needs fixing:


With just a few clicks of the Clone Brush these small dots disappear:

Before cloning or healing a larger damaged area like the background, first I like to use the Adjustment Brush set to Clarity -100, which smooths out some of the funky marks and pixels. You might remember that one of the challenges with editing this photo is that it was scanned at a low resolution and is therefore a small file with pixels easily visible upon enlargement. 
Before Clarity Brush at -100
After Clarity Brush at -100
This shows the background before and after the clarity brush set to -100 has been applied.

Next I used the Clone/Heal brush on the background. 


Looking good! Here is the image with all of the healed areas marked.


Now onto the challenging tears. This tear I was able to fix with the Clone brush in Lightroom


The larger tear really needs Photoshop. You can see how it looks using the Lightroom Clone tool. To undo the changes, just select Ctrl Z for each change you want to delete. Then right click on the image and choose Edit in Photoshop, and then edit a copy with Lightroom Adjustments. 

Here the tear has been repaired with a similar tool in Photoshop called, you guessed it, the Clone Stamp.

In Photoshop I saved the image as a copy, then went back to Lightroom and opened the new image. Just three more steps; 1) smoothed the skin on Catherine's face, neck and arms with the Adjustment Brush, Clarity -50, 2) lifted the highlights in her hair and eyes with Adjustment Brush, Sharpness +35 and 3) applied a light vignette. 

Here are the final and original images:


Don't know why, but that crooked grin reminds me of someone else. I can't help but smile when I look at her. She was so young and pretty. Believe it or not, those are not blond highlights in her hair, but white. The story goes that her hair was completely white by the age of 25. I won't tell you who in the family has her genes. 

Hope that these photo repair steps were helpful. If you have any questions, just give me a shout.

Happy Friday!!!

Scrappy Gen
Let's Remember!

10 March 2011

Photo Edits - Catherine Grace - Color and Lighting Adjustments

Digitally preserving valuable old photos gives me the opportunity to repair the damage that time, neglect and poor materials have caused. Yesterday, I showed you this fearless female, Bubba's mother. She deserves a little beauty treatment, don't you think?

My usual order of photo repair has me adjusting the color of the image last, but the hue of this photo is not doing Catherine any favors. Sallow, dark skin doesn't look good on anyone.

In Lightroom, I adjusted
the Temp slider to -14 
and the Tint to +26.


She is looking prettier already. 


Next I applied the Black and White High Contrast Lightroom Preset. What woman doesn't like highlights?


Her eyes are brighter and her hair is shiny, but she is a little washed out, so I lowered the exposure from +1.15 to +0.39. 


Just adjusting the color, contrast and lighting has made a huge difference in this image. I am happy with it for now. Next time, I will show you how I repaired all of the bumps, bruises and tears. 

This image file is small, so if you click on the image and enlarge it, you will see some pixelation. Not much can be done about that now. The quality of the image is as good as the scan. That is why it is important to be sure to begin the digital preservation process with a scan at a minimum 300dpi and save to Tiff format. 

Happy Thursday!
Scrappy Gen
Let's Remember!


29 November 2010

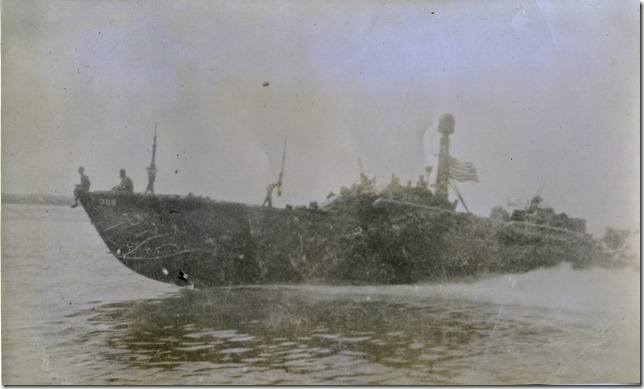
Photo Edits–Rescuing an Old Faded Photo–PT Boat 328

This photo is blown up from another (location unknown) damaged photo. The damage that is visible is part of the image. We actually found two copies kept in archival sleeves, so it is most likely that it was an important picture to Bubba. You can read more about it here.

PT 368
For this photo, I am not interested in a full restoration. The quality isn’t such that I would ever hang it on my wall, but I would like to be able to more clearly read the number on the side of the boat and perhaps during the process other photo clues might become apparent.


As always I begin the process with my trusty Epson 4490 scanner, scanning the photo at 600 dpi and saving in both TIFF and JPG formats. This is a bit of overkill I know, but most websites will not accept the TIFF format and I like to have JPG version handy if I know I will be putting it online. I open the TIFF version in Lightroom to make my photo adjustments. Have I said before that one of the reasons I love Lightroom is that it leaves the original image untouched? Your edits are made and saved in the Lightroom Catalog. You can save new versions to your photo folders by clicking Export, but your original is always available.


Here are the photo adjustments I made.

1. Adjusted Blacks +63
PT Boat Blacks (1 of 1)

2. Adjusted Clarity +100
PT Boat Clarity (1 of 1)

3. Lowered the Contrast –45
PT Boat Contrast Down (1 of 1)

4. Lowered the brightness –61
PT Boat Brightness 1 (1 of 1)

5. There is more substance to the photo, but some of the detail has been lost, so raised Contrast +120
PT Boat Contrast 2 (1 of 1)

6. Can’t leave that brightness alone because I think I see some clouds in the sky. Brightness –32
PT Boat Brightness 2 (1 of 1)

7. It isn’t a color photo, so that isn’t really blue sky peaking through, but I do think clouds are visible.
    A little too dark still. Exposure + 48.
PT Boat Exposure (1 of 1)

Here are the things I have noticed while working with this photo. There are clouds in the sky and land is visible in the background. The two men sitting at the front are not on high alert. Their shoulders and backs are slumped as if they are relaxing (or exhausted) and enjoying a nice boat ride. The boat is flying the American flag. The number 328 is certainly clearly visible on the side, but I didn't notice with the original version that it is also visible on the top of the boat right in front of the radar pole. There may be two or three more men sitting at the top.


Here again is the original scan of the faded photo.
PT 368

I love a good black and white photo as you know from here and here.

You can’t see the clouds as well, but if you were putting together a project with a cohesive look, it might be worth the extra step to convert the photo to black and white. I think it is a little less distracting to the subject.

Happy Photo Editing!

Scrappy Gen

10 November 2010

Photo Edits – Repairing a Damaged Photo - Great Grandma Catherine’s Baby Picture

There is a recurring theme in my life…so many (blank), so little time. I have a pile of books in my house to be read, thus so many books, so little time. There are so many photos waiting to be included on scrapbook pages. There are so many ancestors waiting to be found. And there are so many photos waiting to be fixed and shared. Yesterday’s post about visiting my great grandmother Catherine’s birthplace began with this lovely although extremely damaged photograph of her at toddler age:


Grace Catherine Infant001
Three corners are missing. There are tears, creases, spots and stains. Is this photo a keeper? Absolutely, it’s my great grandmother! It does belong in an archival sleeve for storage to minimize any further damage, but a scan at 300 dpi will give us an image we can manipulate and also will serve as a visual index of the original copy. 

When scanning your old photos, it is good to make use of the properties setting for the new image. Good photo indexing starts with giving all newly scanned photos descriptive names including a date (can be an estimate), last name, first name and sometimes birth year of the subject. Then, after saving the image with that descriptive file name, right click on it and choose properties. Click on the details tab (in Windows 7). Under this tab additional information regarding the photo can be added including title, subject, tags, comments and date acquired.

It's time to get back to the task at hand. First I opened the photo in Photoshop Elements 8 and cut out the areas of the scan that were not part of the picture:
Grace Cath 1 Edit Cut out Damaged Areas

The largest missing area on the lower left required some creativity in order to rebuild the missing parts of the wooden chair. I used the selection tool to copy a piece of the chair and paste it over the missing corner to continue the line toward the bottom of the photo. It looks a little funky to start, but it will get better.
Grace Cath 2 Begin to Rebuild Chair

Here I continued the process of selecting, copying and pasting pieces of the chair.
Grace Cath 3 chair rebuild almost done

Here I have finished rebuilding the chair with both the the selection tool and the clone tool. Both tools are almost as easy to use as the cut and paste tool in a word document. My result is far from perfect on close inspection, but it is a big improvement.
Grace Cath 4 chair rebuilt, background on bottom filled in, then lots of smudging

The clone stamp tool easily repaired the upper left hand corner and the tears at the top middle and upper right corner.  
Grace Cath 5 background repaired - looking good glad the face isn't damaged

Catherine’s face, hair and dress somehow remained undamaged. I did erase a couple of spots on her face and a stain or two from her dress using the clone tool in lighten mode.
Grace Cath 6 fixed pookie on her face and a couple of stains on her dress

I lightened the staining and spots on the rest of the background, again with (you guessed it!) the clone stamp tool. This photo is a little larger so that you can more easily see the details.
Grace Cath 7 lightened upper corners, removed background pookies

Because I couldn’t leave well enough alone I used the smudge tool on the background to clean it up more. Not sure which is better and I haven’t actually used the smudge tool for this purpose before. With more practice I think the effect could be subtler. Here is the finished photo with the damaged photo for comparison.
Grace Cath 9 final  Grace Catherine Infant001
And because I really can’t leave well enough alone and because I don’t like how the color is looking in my finished photo, here are two more options that I like:
Grace Cath option (1 of 1)  Grace Cath option 1

The possibilities are endless and it’s great to have options. This is a photo that can be put on a scrapbook page without worry about damaging the original. It can also be endlessly reprinted to share with all of Catherine's children, grandchildren, great grandchildren and great great grandchildren. Although Catherine is no longer living, her spirit and memory live large in her descendants.

Hope this has given you ideas for your own old and damaged photos.

Scrappy Gen

22 October 2010

Repairing a Damaged Photo

My sister took a look at the repairs I made to Bubba's sailor photo and asked if I could do anything with a damaged photo that happened to be one of her husband's favorites. I love a challenge and so I set to work. Here is the original photo as she sent it to me by email:


There are lots of problems; several damaged areas, lots of dust and fading. The first thing I did after I opened the photo in Lightroom 2 is add a Direct Positive Lightroom preset. Here is the result:
Yes, it looks too extreme and too dark in areas, but I am bringing this image along with the original image into Photoshop Elements 8 where I will blend them together for a more pleasing color palette. Using my favorite tool, the clone tool, set to normal I repaired the two damaged areas in the center. Here is how it looks now that it is blended and the damage is repaired:
There are two things about this photo that are bugging me. One is the fact that the horizon is off kilter and the second is that the information board in the foreground is distracting from the image of my sister and the view of the beach. The board could be useful to keep in the photo if you might someday want a clue as to location, but I think my brother in law likes this picture because of the main subject, my sister The cropping I did back in Lightroom 2 because I like that crop tool better than the one in PSE 8. Here is a cropped image with the horizon straightened and the board removed:
Looks good, but we're not done yet. There is still way too much dust. I adjusted the Luminance in Lightroom, which affected the dust slightly, but not nearly enough. Here is the result, which doesn't show a discernible difference:
Back again in PSE 8 I used the clone tool set to darken and normal to repair the dust spots on the fence, beach and sky. The last thing that was really bugging me was my sister's face. Well, my sister's face doesn't bug me anymore (not since we were teenagers), but the pixels in her face were detracting from the final image. This is not something I have repaired before. I decided to try the smudge tool. The first time I used it at 100 percent and it just made her look weird. Finally I used it at 50 percent and stayed away from the defining lines of her face and it looks much better. Here is the final picture along with the original for comparison. Let me know what you think in the comment section below.
Related Posts Plugin for WordPress, Blogger...