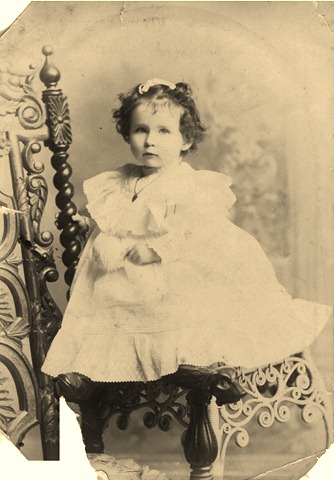
Three corners are missing. There are tears, creases, spots and stains. Is this photo a keeper? Absolutely, it’s my great grandmother! It does belong in an archival sleeve for storage to minimize any further damage, but a scan at 300 dpi will give us an image we can manipulate and also will serve as a visual index of the original copy.
When scanning your old photos, it is good to make use of the properties setting for the new image. Good photo indexing starts with giving all newly scanned photos descriptive names including a date (can be an estimate), last name, first name and sometimes birth year of the subject. Then, after saving the image with that descriptive file name, right click on it and choose properties. Click on the details tab (in Windows 7). Under this tab additional information regarding the photo can be added including title, subject, tags, comments and date acquired.
It's time to get back to the task at hand. First I opened the photo in Photoshop Elements 8

The largest missing area on the lower left required some creativity in order to rebuild the missing parts of the wooden chair. I used the selection tool to copy a piece of the chair and paste it over the missing corner to continue the line toward the bottom of the photo. It looks a little funky to start, but it will get better.

Here I continued the process of selecting, copying and pasting pieces of the chair.

Here I have finished rebuilding the chair with both the the selection tool and the clone tool. Both tools are almost as easy to use as the cut and paste tool in a word document. My result is far from perfect on close inspection, but it is a big improvement.

The clone stamp tool easily repaired the upper left hand corner and the tears at the top middle and upper right corner.

Catherine’s face, hair and dress somehow remained undamaged. I did erase a couple of spots on her face and a stain or two from her dress using the clone tool in lighten mode.

I lightened the staining and spots on the rest of the background, again with (you guessed it!) the clone stamp tool. This photo is a little larger so that you can more easily see the details.

Because I couldn’t leave well enough alone I used the smudge tool on the background to clean it up more. Not sure which is better and I haven’t actually used the smudge tool for this purpose before. With more practice I think the effect could be subtler. Here is the finished photo with the damaged photo for comparison.


And because I really can’t leave well enough alone and because I don’t like how the color is looking in my finished photo, here are two more options that I like:


The possibilities are endless and it’s great to have options. This is a photo that can be put on a scrapbook page without worry about damaging the original. It can also be endlessly reprinted to share with all of Catherine's children, grandchildren, great grandchildren and great great grandchildren. Although Catherine is no longer living, her spirit and memory live large in her descendants.
Hope this has given you ideas for your own old and damaged photos.
Scrappy Gen


You did a wonderful job repairing the photo and explaining your process! I enjoy repairing old photos too and love seeing the difference! But for me there was much swearing during my first few tries until I got the hang of it! :)
ReplyDeleteGreat job! I really love it! Your great grandmother would be proud as well!
ReplyDelete